CLICK HERE FOR BLOGGER TEMPLATES AND MYSPACE LAYOUTS »

Thursday, 30 April 2009

How to photograph buildings

10 Jan 2002 - from http://www.ephotozine.com/

How to photograph buildings - We live in them, we work in them, and most of us sleep in them. But what about photographing buildings?

How to photograph buildings
We live in them, we work in them, and most of us sleep in them. But what about photographing buildings? Any one who has a camera has probably taking a picture of a castle, local church or tourist monument, but buildings offer much more scope from the intricate details of historical cathedral or the graphical shapes of modern architecture. We take most of the buildings around us for granted and with a little extra perception youll start to see a whole new way at looking at architecture and its many forms.What gear do you need? Any camera from a single-use to a sophisticated SLR is capable of recording a decent picture of a building. Ideally you will often need a wide-angle lens but if you do have a fixed option look around for viewpoints where you can get the whole building in shot. Walking back up the road away from the interesting architecture or stepping across the courtyard will give you the necessary space. Or you could play up the strengths of your fixed lens camera and move in close on smaller areas of the building. SLR users who invest in a wide-angle lens or those with a compact with a zoom lens can open up far more options. With a wide-angle you can fill the frame from close range and take shots when you normally wouldnt be able to, such as in a narrow street or from a confined viewpoint.


When using a wide angle you will find that walls of a tall building lean inwards when you shoot from a low angle. This can be prevented by using a special lens known as a shift lens to correct the perspective problems, but a less costly way is to find a distant viewpoint and use a longer lens or from close range if you can gain height by climbing a nearby hill or shoot from the upstairs window of a building opposite that will help. Specialist architectural photographers take step ladders with them to gain the height. Ideally you want to a viewpoint that positions you about halfway up the building any higher and the bottom of the building will start to slope inwards. These correction problems can also be sorted out using the transform tool of an image-editing program, which weve covered in a previous tutorial. You may, however, want to exaggerate the sloping walls, as I did in the above example, by shooting wide and going low. The alternative end of the spectrum is to use a long lens to home in on small details such as gargoyles on a church or an interesting carving in its masonry.

What film?

Slow speed film with fine grain will ensure you record all the subtle details in a building. This will ensure you record all the detail so you will be able to read any plaques or display boards, as well as see all the intricate carvings. As most of your pictures will be outdoors and the subject is static you can usually get away with using ISO film, which has very fine grain. You may prefer to try black & white and if so adding an orange filter to your kit will ensure that the brickwork is recorded with superb tonal range and the sky behind will be saturated with white clouds against the dark blue background sky.

If you venture inside youll need a tripod to avoid camera shake especially with church interiors that are often dimly lit. In brighter buildings lit by fluorescent or tungsten lighting you will need a filter when shooting using colour film. A tungsten (household type lamp or reflector type) will add an orange cast and needs an 80B blue filter to correct the colour, while a fluorescent strip lighting will introduce a green cast and needs AN FL-D magenta filter to correct the problem. If you have a digital camera the cameras automatic white balance control should sort out the colour. If not switch to manual and key in the appropriate setting, checking the LCD preview to see the effect.


Exposure


Photographing buildings is one of the easier subjects to measure the light from. In most cases the brick or stone is a similar tonal value to mid grey so the meter will record it accurately. Problems will generally only occur if the material used is very dark (coated glass) or very light (white painted structures) In these cases the camera will compensate making a dark building to light and a light building too dark. Open up a stop or close down one stop to compensate. So, for example, if the exposure you get is 1/30sec at f/8 when shooting a dark building select 1/60sec at f/8 or 1/30sec at f/11. If its 1/250sec at f/8 when shooting a white building, select 1/125sec at f/8 or 1/250sec at f/5.6. If your camera has exposure compensation set either 1stop or +1 stop respectively.


If you have an auto exposure lock point at your hand (if its in the same light as the building) and lock the exposure.One other area that can fool the camera is when the sun is behind the building and in the frame. The bright area will fool the camera into setting a shorter exposure and the building will become silhouetted. Point down so just the building is in the shot, take a reading and recompose using manual or the auto exposure lock.
They say a picture paints a thousand words so now lets look at some practical examples of techniques you can try.


A telephoto lens can also be used to create dramatic patterns by filling the frame with a repetitive brick structure, modern glass building fascia or tiled rooftops. Shoot from an oblique angle and the perspective will change dramatically creating lines disappearing towards a vanishing point


Left: A 200mm telephoto shot of the houses of parliament building in London. Most pictures you see of these famous buildings show the whole structure. By cropping in tightly you can highlight the fantastic repetitive detail and make an interesting pattern.
Right: The 80mm end of a 28-80mm zoom was used here to crop in on these modern apartments in the Canary Islands. I made use of the rule of thirds (see previous article on composition) placing the wall and blue railing on the intersecting lines.
Above: Use am arch or tree to provide a natural frame around your picture.


Left: In this shot at Fotheringhay I walked down into a dip in the field that had a huge puddle and positioned myself to get a reflection of the impressive church. This adds impact to a shot that could have ended up being a typical horizontal view of the church.


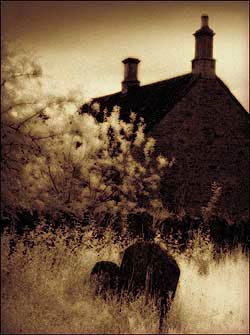
You don't have to shoot in colour all the time. Black & white makes an often more dramatic alternative. This shot of a plain looking building has been improved by shooting on infrared. Here I used a digital camera and enhanced the result using Photoshop to darken the sky, increase the glowing areas of the foliage and added a sepia tone.


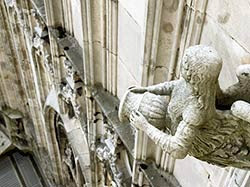
You are often allowed to climb up to the rooftops of churches or cathedrals and doing so present many photographic opportunities. As well as gaining you a great viewpoint of the city you can often find interesting statues projecting out from the walls. This shot taken at the Duomo in Milan. Just one of its 3500 statues to choose from!

Night Photography of Buildings


by Geoff Lawrence

Photographing buildings at night raises new problems but can produce great images. The first problem is that there is a lot less light so holding the camera steady can be a problem. The best way is to use a tripod but I couldn't fit one in my suitcase so I had to find another way. One good way to give yourself extra support is to lean against a tree or sturdy lamp post, bracing yourself in this way and locking your arms tight into your body can get you a reasonably sharp exposure at 1/15 sec or even down to 1/4 sec. Another even better method is to brace the camera against a signpost or sturdy support such as a wall. If you are sitting at a cafe you can often get good shots by placing the camera on the table. I was doing this a few days ago, using a book under the lens to adjust the height and got sharp pictures at very slow shutter speeds.

The other problem with night photography is the very high contrast of the scene, this can send your automatic metering system into a complete frenzy. If you have mastered the art of bracketing exposures on your camera I would suggest that this is a good time to use it. The idea of bracketing is that you take one exposure at the 'correct' setting according to the light meter and then you take one or more at higher or lower readings. Most of the better cameras these days will have a special knob for doing this so you don't have to resort to manual exposure. Just click the wheel to +1, +2 or -1, -2 etc. The big question is which settings to use and how finely tuned do your different exposures have to be. A professional shooting in the studio will bracket his exposures 1/3 of a stop apart, but you or I looking at the results might not be able to see the difference between one shot and another. A whole stop on the other hand might be too much - see Aperture.

In a night scene you are inevitably going to have quite a lot of black and there will usually be light sources in the scene which will normally be burned out white, at least in the centre, so the object of bracketing is to control the highlights so they don't get too out of hand. As you can see in the photo above there are halos around the lights but they are, in my opinion, under control. There are no rules about how big your halos should be, it's up to you, but massive blobs of white in the picture can look pretty ugly. Normally I would not recommend a highlight near the edge of the picture as this can lead the eye out of the frame, however I tried this photo with and without the street lamp on the left and decided to leave it in. Rules are there to be broken but it's nice to know you're breaking them.
from www.geofflawrence.com

Photographing Buildings


by Geoff Lawrence

The Right Light
If you prefer to go on sightseeing holidays rather than flopping on a beach then you're probably going to want to take photos of the buildings you visit. The trouble is you're always there at the wrong time of day, the light is coming from the wrong direction, there are crowds of people blocking your view and the rest of the family are nagging you to put the camera away and get moving. You could just buy the postcard but, if you are a photography junkie like me, that will never be an option. Although sometimes I might buy a postcard as an insurance policy in case my photos are not good enough.
The best time of day to take photos of any outdoor subject is either the early morning or the evening when the sunlight has a reddish hue and the light is coming from the side rather than directly overhead. Early morning is best, there is a difference in the quality of light that I find it hard to put my finger on, also there are normally less people around. Obviously if you are photographing buildings the best time of day is going to be dictated by which way the building is facing. The photo on the right was taken at about 7.30am, I had spotted the building the day before but the light was all wrong so, as it was close to the hotel where I was staying I decided to go back in the morning.
As with any other type of photography you should ask yourself what it is about this particular building that you like and focus on that. Sometimes this will mean framing the whole building, sometimes it will mean picking out details and sometimes a mixture of both will work well. In the photo above it was the tower on top of the building that caught my eye but I found that I needed at least some of the building to give the tower context.

Framing
When photographing buildings, especially the tops, you often end up with lots of boring sky so a good trick is to frame the top of the building with a branch or two from a nearby tree. I was quite lucky with this shot the trees were there waiting for me, all I had to do was go and stand in the right place, but I would not be above dropping in a branch from another photo using a bit of Photoshop magic. Looking around for a tree before you take the photo though will always be more convincing and with zoom lenses it is easy enough to adjust your perspective to fit everything into the right place. It can be hard to get the scale and the lighting just right when you try to put the tree in afterwards.
Getting the perspective right
All the photos on this page were taken on a holiday trip to Barcelona where, amongst other delights, we wanted to see the work of the architect Antoni Gaudí. The photo on the left is of a building that was reworked by him in the 1920s. This building is quite difficult to photograph because the trees that line the roadside get in the way. I wanted a shot of the whole facade and the only way I was going to get it, without chopping the tree down, was a drastic tilt of the camera. In this instance the look is quite dramatic and the use of a wide angle lens makes the building look as though it is bending over backwards. Whenever you tilt the lens upwards to get the top of the building into the picture you will notice that the sides of the building converge towards the top and the building appears to be leaning over backwards. In a shot like this one it doesn't really matter but, if you want your buildings to be upright, and personally I hate to see photos of buildings where the verticals are slightly off, then you either have to shoot from a higher vantage point or you need to employ a little trickery.
In the bad old days of film the best option was a special 'anamorphic' or shift lens which would correct the verticals for you. There was also an option to correct the perspective in the darkroom by tilting the enlarger at an angle but in the modern world we use the 'perspective' or 'distort' adjustment in Photoshop to spread out the top of the picture until the verticals are once again vertical.

If you have ever tried to do this to one of your photos and found the adjustment greyed out as unavailable, the probable reason is that you are trying to apply the adjustment to the background layer which will not work. If you double click on the layer in the 'layers' palette you get the option to rename the layer and the default option is 'layer 0' click yes to this and the layer will no longer be the background and all the perspective adjustments will work.


Here are three more photos of the same building, in the shot on the right I have corrected the verticals in Photoshop by stretching out the top of the picture. This seems to work remarkably well considering the programme must have to insert pixels into your picture to make up the size. I suppose a purist would not stretch the top but shrink the bottom and then crop the sides.
Normally when I am out and about I carry two zoom lenses, a mid-range which covers approximately 28-80mm (in old fashioned 35mm terms, now 18-55mm) and a 75-300mm telephoto. This covers me from moderate wide angle to about as much telephoto as it is sensible to handle without a tripod. The two pictures on the left are details from the facade showing the 'bits that I like' picked out with the telephoto lens.

Tuesday, 28 April 2009

Basics of Photoshop

How to use Photoshop?

Below is a sample of my tutorials. Don't use this one here as it is too small.

These are on TEACHING RESOURCES.

Alternatively, use the files on my YOUTUBE channel - I will fix the link soon!

Youtube Channel is 'Mediamonkeymovies2'


Pattern, Shape, Volume, Lighting, Texture and Tone


PATTERN
Creating your pictures around repeating elements or patterns provides picture unity and structure. Pattern repetition creates rhythm that the eyes enjoy following (fig. 5-15). When lines, shapes, and colors within a picture occur in an orderly way (as in wallpaper), they create patterns that often enhance the attractiveness of photographs. Pattern, like texture, is found almost everywhere. It can be used as the primary subject but is most often used as a subordinate element to enhance composition. When pattern is used as a supporting element, it must be used carefully so it does not confuse or overwhelm the viewer. Pictures that are purely pattern are seldom used, because they tend to be monotonous. Patterns should be used to strengthen and add interest to your subject.

Shape is the most common and powerful pattern element. Repeated lines, tone, and color can also provide unity to your composition and combinations of these create interesting pictures. Triangles, squares, and circles are the basic shapes to look for in a pattern. Triangles and squares are usually static but can be placed to create a tension-filled, dynamic effect. Circles and curves are pleasing pattern shapes.


VOLUME
When photographing most subjects, you face the problem of how to symbolize three-dimensional objects in a two-dimensional picture. The solution becomes simple when a distinction is made between the two different ways three-dimensional objects appear: as positive, or occupied space (volume) or as negative, or unoccupied space.


LIGHTING
Lighting is also an important creative element of composition. By controlling the light and directing it where you want it, you can subdue objects or distracting elements in the scene to give more emphasis to the main point of interest.


For good picture composition, you must develop an awareness of how changes in lighting can affect the appearance of things around you. Light and shadows can be used in composition to create mood, to draw attention to an area, to modify or distort shape, or to bring out form and texture in the subject.


Shadows are a key to apparent form in photographs. Without shadows, the subject records without form, curvature, or texture, appearing flat and lifeless. This does not mean that shadows must be harsh and black to achieve the effects of form, curvature, and texture. They may be soft, yet of sufficient density to show the most delicate roundness and form. Generally, harsh, black shadows are undesirable in a photograph due to the loss of detail in them. From a compositional standpoint, black shadows can be very useful in balancing a scene and directing attention to the point of interest. Harsh shadows can also be excellent for emphasizing texture and form, for creating interesting patterns, and for directing attention to the main point of interest; however, the same elements can also obscure detail and reduce form. When the lighting is harsh, such as on a clear, sunny day, shadows have sharply defined edges and are probably very dark, sometimes to the point that they appear stronger than the primary subject and attract attention to themselves.


TEXTURE
Texture helps to emphasize the features and details in a photograph. By capturing "texture" of objects being photographed, you can create form. When people observe a soft, furry object or a smooth, shining surface, they have a strong urge to touch it. You can provide much of the pleasure people get from the feel of touching such objects by rendering texture in your pictures. Texture can be used to give realism and character to a picture and may in itself be the subject of a photograph. When texture is used as a subordinate element within the picture, it lends strength to the main idea in the photograph. It usually takes just a little different lighting or a slight change in camera position to improve the rendering of texture in a picture. When an area in a photograph shows rich texture, the textured area usually creates a form or shape; therefore, it should be considered in planning the photograph (fig. 5-16).

TONE
Tone is probably the most intangible element of composition. Tone may consist of shadings from white-to-gray-to-black, or it may consist of darks against lights with little or no grays. The use of dark areas against light areas is a common method of adding the feeling of a third dimension to a two-dimensional black-and-white picture. The interaction of light against dark shades in varying degrees helps to set the mood of a composition. A picture consisting of dark or somber shades conveys mystery, intrigue, or sadness. When the tones are mostly light and airy, the picture portrays lightness, joy, or airiness.

Links Online

Photo-Tips Sites:
1) Basic Photography Tutorials http://www.silverlight.co.uk/tutorials/index.html
2) Focus on Photography http://www.azuswebworks.com/photography/
3) Some Learning and Advice - http://photo.net/learn/
4) Exposure - a beginner's guide to photography http://www.88.com/exposure/
5) Kodak http://www.kodak.com/
This is a huge website from the photo-industry pioneer. The site offers photo taking tips, an online catalog of products, and a picture gallery - follow the LEARN link

Black And White Photography: Open Your Eyes To A Different Reality

Written by: Andrew Goodall Photos by: Rory Mole


Black and white photography is a rewarding and challenging field of artistic photography. Even people who don't care about photography can find themselves drawn to a great black and white image. As a photographer, black and white can allow you to discover a whole new character in a familiar subject. For many digital photographers, black and white photography is nothing more than colour photography converted by software. It is a matter for your own judgement whether this is effective for your photographs.


Often the image you assume will convert beautifully to black and white will prove a disappointment; sometimes a photo you never imagined will surprise you. However, most serious photographers will tell you that the best black and white photos are taken when the photographer deliberately sets out with black and white images in mind. This creates an entirely different mindset in terms of how you choose and approach your subject. You may, for example, start to see potential in subjects you would never normally consider for colour photography.If you have never had a serious go at black and white photography, here are a few simple tips to help you get started.

Black And White Photography Tip #1. Choosing A Subject. Some subjects lend themselves to colour but are not nearly so effective in black and white. For example, sunset photographs rely on the colour of a great sky for their impact, and rarely produce a good black and white image. Colourful birds, flowers, fashion...there are many times when the only logical approach is to shoot your subject in colour. On the other hand, some subjects are ideally suited to black and white photography.Because this is an 'old-fashioned' medium, it often works well with old-fashioned subjects. Rustic items like old farm equipment, a tumble-down shack, an old wooden fence can all be great subjects for black and white photos.When photographing people, age can also be a factor. A close-up portrait of an aged face showing all the lines and creases of their years on earth can have much greater impact in black and white.This can only be a short article, so these examples are just the tip of the iceberg. You will find many great subject once you start thinking in black and white.

Black And White Photography Tip #2. 'Seeing' Your Subject In Black And White. When you first approach your subject, you need to imagine how it will look without colour. Try to look at it in terms of lines and shapes, shadows and contrasts. You will begin to see your subjects in a whole new light. You may even find yourself zooming in on a particular feature, or photographing the subject from an angle you might never have considered in the past. One thing is for sure; once you get into the 'black and white headspace' your camera will express the character of the subject in an entirely different way.

Black And White Photography Tip #3. Use The Light To Enhance Impact. Because a black and white photo relies so much on shadows to define shapes and details, your approach to lighting can make or break an image. As a nature photographer, I often photograph black and white photos quite differently from colour photos.You have probably heard the rule that the best landscape photography is done early or late in the day when the sun is low and the light is soft and even. Well, in black and white photography I often look for just the opposite.

To create better definition in a subect I will often take my photos through the middle part of the day, to create heavier shadows to emphasise the lines and shapes in the composition. I am also more inclined to take photos looking directly toward the sun, to produce silhouettes that make the most of trees, windmills and other strong shapes against the sky.

Earlier I mentioned a portrait of a very old person. If it is the lines on a face that give the image its character, you need to make sure the lighting is from an angle that produces shadows in the creases. Thus you may be looking for lighting in a black and white photograph that would be considered unflattering and unsuitable for a colour photograph.

So there you have three very simple tips for black and white photography. Notice that they are all about the creative approach, not about settings and camera techniques. In fact most of the time, black and white requires no different technical expertise than colour photography. To take better black and white photographs, you don't necessarily need to change the way you use your camera. Instead, you are looking to change the way you see the subject, and how you can use light, shade and composition to capture the character that black and white photography has to offer.

I am sure you will enjoy experimenting with black and white. It may open your eyes to aspects of your world that have never turned you on before. Visit http://www.naturesimage.com.au to find Andrew Goodall's images and ebooks on photography for beginners. While you are there, why not sign up to the online newsletter for regular tips and updates...it's free!

(with thanks to Picturecorrect.com )

Portrait Photography

In portrait photography there are a few guidelines that you should review and think about when you take pictures of people. The three general types of portrait photography are: close-ups or facial shots, upper body shots, or environmental portraits (where you focus on the subject and the surrounding environment that gives the subject character).
Some of the best portraits are where the subjects look completely comfortable like their not looking at a camera. When people try to smile or make a certain kind of face for the camera it usually doesn't seem very genuine. The trick is to capture the image when the subject(s) aren't necessarily focused on the camera. The main purpose of portrait photography is to capture the essence of the subject(s).

Different people have different techniques for doing this, one of which is taking a picture while the subject is planning on smiling and then take another couple while they are recovering. Or another way would be to tell a funny joke where they can't help but genuinely laugh and smile. But probably the best way is just to catch them off guard by waiting for the right opportunity and snapping a picture right when they look at you not expecting a camera.


Close-up portraits usually have the subject's shoulders and head or less. They are basically framed around the face. These are the best to capture expressions and glamour shots. It is very important to have the light coming from a good angle for these. If you want to accent wrinkles or small details you should have the light coming from the side or from the top. If you want flattering pictures you should take these on a day that's cloudy so there is a lot of diffused light and therefore no shadows.


You will get the best results if the subject is brighter than the background so there is not much distraction. For these you should use a wide aperture (low f/stop) to make the background out of focus and less of a distraction. Professionals usually use a fixed telephoto lens that's 90 mm or a little higher for portraits for the reason that it de-emphasizes the subjects nose or any other unflattering feature because at that far away the nose or any other significant feature doesn't seem closer to the camera than the rest of the face.

Upper body shots or midrange portraits are a little less personal than close-ups. These are easier to get satisfactory results from mainly because your subject is probably more relaxed plus you can include a little of the background. These are probably the most commonly used for single subjects and multiple subjects. The ideal lens would be around a 90 mm fixed telephoto lens but if there's many subjects in your frame you will need more of a wide-angle lens. These are usually used to mark occasions such as graduation, school yearbook, birthdays etc...

Environmental portraiture are portraits that let us into the life of the subject. These usually include the whole subject in a scenario or partaking in some hobby that they enjoy. These are best for telling a story to the viewer about the subject in the pictures. Photojournalists almost always use these to look into the lives of interesting people. These also work very well in Black and White.


(with thanks to Picturecorrect.com )

Night Photography


Photography at night can be used to create amazing pictures. For this kind of photography a tripod is almost a must. If you want to get a clear exposure with a great depth-of-field, then you will need a tripod. Usually when we take pictures of sunsets or bright lights we just center all the coloring and shoot the picture.
But something that you should think about doing is adding some foreground item to frame and then shooting which will create a greater depth to the picture, and most of the time make the results look even more brilliant. This picture above was framed with two overhanging trees and a railing. The aperture was very narrow (high f/stop), and the shutter speed was about 10 seconds. Even though a tripod was used, the self-timer was used also, to eliminate any shake.


When photographing sunsets you should not only include foreground items but use the rule of thirds, specifically the horizontal section of thirds so you get a good perspective on the scene. The sunset picture right here was split up into about 2/3's foreground and 1/3 horizon, but this same picture would probably still look good with 1/3 foreground and 2/3's horizon. Also, when you take the light reading with your camera make sure you don't point it directly at the sun, if you do your picture will be underexposed. Take the light reading from the coloring around the sun so you get an exposure that is ideal to accent all the colors.
When trying to photograph fireworks or lightning you will definitely need a tripod. There are different techniques to doing this but probably the easiest is just setting your camera up pointed at a good range of sky and setting the aperture narrow (high f/stop) and setting the shutter speed very long or just by using the "bulb" function of shutter speed (the "bulb" function allows you to open the shudder and close it manually, so its not on a set time). Many people try this in different ways so its just good to experiment and try different things.


(with thanks to Picturecorrect.com )

Use of Light in Photography


The use of light in a photograph can be the deciding factor of whether that picture will be spectacular or terrible. When you use your camera to automatically chose aperture and shutter speed, what your camera is actually doing is using the built in light meter and measuring how much light is being reflected to the camera.
But that doesn't mean that's all there is to it. You should also think about the angle of the light entering the frame, what kind of shadows you want, and whether you want to use fill-in-flash (using flash to light the subject if you have a really bright background). If you are shooting at night you can create all sorts of cool effects like lights in motion, pictures with moonlight, or silhouettes like the one shown here. The following are just some examples of all the possibilities.
The angle of light should be taken into careful consideration whenever you feel like you want to create a specific effect. Shadows can be very powerful when cast over half of someone's face. In this photo on the left the light is striking the statue's face from the rear right of the camera and this adds more depth to the picture. It also adds more coloring because if front-lighting was used his face would likely be over exposed, and if back-lighting was used his face would just be black like a silhouette.


The effect of rays of light indoors and outdoors. can be very spectacular. A brilliant part of some great photographs is the ability to see actual rays of light. Whether it be in the setting of a brilliant sunset, light pouring through a window or from artificial lights it can look very impressive. Usually the only way to obtain something like this is a narrow aperture (high f/stop) and a very slow shutter speed.


Silhouettes are another interesting example of using light. The way to create a silhouette is to have significantly brighter light coming from behind the subject. In doing this it is important to take your camera light reading off of the background instead of the subject in order for the camera to adjust for an exposure based on the backlight. If you do this the subject will be successfully underexposed like in the picture at the top of this post.


If you keep experimenting with different ways of using light you will find that you can get very interesting results. The longer the exposure, the more fascinating the results with light most of the time. In the picture on the right, this is a long single exposure and yes that is the same person in two places. If your wondering how this was possible, here's how.


The shutter speed was set for around 30 seconds, the camera was set on a tripod and someone stood next to the camera with a flashlight. The subject then stood in one place while the flashlight was pointed at him and moved in an up and down motion. After around 15 seconds the flashlight was turned off and the subject was told to move to his left. Then the flashlight was pointed at him again and moved up and down until the camera finished the exposure.


(with thanks to Picturecorrect.com )

Photography: The Rules of Composition


Composition is the combining of distinct parts or elements to form a whole. In photography that thought is very important in taking good pictures. The following guidelines are just to be thought about though, it is not necessary to try to use them with every picture you take or there wouldn't be any creativity in your work. Once you learn these rules and strategies you will be more prepared to find great picture spots and opportunities.


Before you just step up and take a picture you should consider what you want your viewers to look at and how you should display main points of interest. You should ask yourself, what is the main subject? What angle should the light be hitting in my picture? Is there anything that could accentuate the main subject? Where should the main subject be in the frame? These are all important things you should consider, but that doesn't necessarily mean you need to follow the rules exactly.
The Rule of Thirds has been used for centuries and is probably the most important of all the composition techniques. The Rule of Thirds means that the frame can be divided into three horizontal sections and three vertical sections and therefore, where the horizontal and vertical lines intersect makes an ideal location for the more important parts of your picture. By locating your main subject at one of the four intersections you give the subject more emphasis than if it was right smack in the middle of the picture. This is also a good technique if you have more than one important subject, the intersections can still work even if there's a subject on more than one. The divisions can also be helpful in setting up a picture, they can for example, help you determine how much horizon you want. Most famous photographs or paintings in the world today have the rule of thirds applied to them in some way.

Simplicity is the method of keeping the information in a photograph relatively simple. If your main subject is close, then your background should be very simple to avoid distractions. You should try to keep everything not important much less interesting than what's important in the frame. Especially avoid lines or objects that lead the eye away from the subject.

Framing is the tactic of using natural surroundings to add more meaning to your subject. It could be anything such as bushes, trees, a window, or even a doorway like in the picture at the top of this page. In the process of doing this you need to be careful that you don't only focus on what's framing your subject. Make sure you focus on the main subject, and also it is a good idea to use a narrow aperture (high f/stop) to achieve a high depth-of-field. It also wouldn't hurt if the part of the picture framing the subject was darker so make sure you take your light reading on the main subject.

Texture can add a significant amount of interest in any picture. When people see texture in pictures they start imagining what it feels like to touch what's in the picture. Texture is a good idea when your taking pictures of rocks, walls, surfaces, someone's hands, or leaves. In order to make a picture reveal a texture you must make sure the light is coming almost exactly from the side of the surface so it creates shadows in places key places.


Leading Lines are used to lure the eye deeper into a picture or to an important subject. Straight, curved, parallel, or diagonal lines are all good at promoting interest. Good examples could be roads, rivers, streams, bridges, branches, or fences but there are endless things that could be used.


Colours are what add heart and emotion to your pictures. Certain colour configurations can inspire awe and amazement in onlookers. Colours can be used to add all sorts of accents and effects, but you must be careful to not draw attention away from the main subject.
It might not be a bad idea to keep these key terms with you when you practice taking pictures. The best way to learn and improve your composition is just lots of practice and experimenting.

(with thanks to Picturecorrect.com )

Photography Exposure Basics


Exposure is the amount of light collected by the sensor in your camera during a single picture. If the shot is exposed too long the photograph will be washed out. If the shot is exposed for too short a time the photograph will appear too dark. Almost all cameras today have light meters which measure the light in the given shot and set an ideal exposure automatically. Most people depend on the light meter which is fine, but if you know how to control your exposures you can get some creative and sometimes better pictures. (The photo on the left is with low shutter speed and narrow aperture (high f/stop).

The two primary controls your camera uses for exposure are shutter speed (the amount of time the sensor is exposed to light) and aperture (the size of the lens opening that lets light into the camera). Shutter speeds are measured in seconds and more commonly fractions of a second. (1/2000 of a second is very fast and 8' seconds is extremely slow).

Apertures are measured in something called f/stops (a very wide aperture is f/2.8 and a very small aperture is f/19).

You might wonder why there is not just a constant shutter speed or a constant aperture so that you would only have to worry about one control. The reason is that even though they both control the amount of light getting to the sensor they also control other aspects of the picture.


Shutter speed for example can be used to freeze subjects in midair with a fast speed or it can be used to blur water with a slow speed. Aperture controls the depth-of-field which is what is in focus in the picture. Aperture can be used to draw attention to one subject (like the flower on the right) by blurring the background with a wide aperture (low f/stop). Aperture can also be used to focus everything in a picture with a narrow aperture (high f/stop).


On most digital SLR's (Single Lens Reflex) cameras today you can even change the sensitivity of the sensor when collecting light which is called the ISO speed. The common span of ISO speed is 100 to 800. The higher the ISO speed the faster the camera collects light but it also adds more noise to the photograph than the lower speeds. For example if your trying to take pictures in dim light without a tripod you might want to raise the ISO speed in order to get a picture that's not blurry. Most of the time you should keep it at a lower ISO speed if there is enough light, but it makes a big difference when there isn't.


The above picture has low shutter speed and slightly narrow aperture (pretty high f/stop).

The best way to learn how to use shutter speed and aperture is to just keep experimenting with them.
(with thanks to Picturecorrect.com )